Showing posts with label Ubuntu. Show all posts


Grub2 bootloader ျပန္ထည့္နည္း

Restore GRUB2 after installing Windows

How I Restored GRUB2 after a Windows 7 Install. GRUB2 (Grand Unified Bootloader)  is a universal bootloader used by Ubuntu and other Linux Distributions. If you have a Linux Distribution installed on a partition, and attempt to  install Windows alongside it, your GRUB bootloader will be overwritten by the Windows bootloader, and your computer will only boot into Windows.
Recovering the GRUB2 Bootloader after a Windows Install  is simple. When finished, your Bootloader should detect all installed Operating Systems and automatically add a bootable menu item for each of them.
Note: This GRUB2 Installation process assumes that a Linux Partition still exists. If you overwrote Linux with Windows, this tutorial will not work for you, as there is no Linux system to recover boot.
How to Restore GRUB2 after installing Windows:
  1. Boot from an Ubuntu Live CD or Live USB
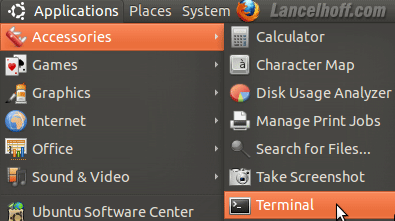
  2. Once up and running, Open a Terminal Open a Terminal
  3. Type sudo su (press enter after typing each command)
  4. Type fdisk -l Type sudo su and then fdisk -l
  5. Note which device contains your Linux partition (IE: /dev/sda1) Locate your Linux Device

  6. Type mount /dev/sdx# /mnt (replacing x# with your actual device and partition number)
  7. Type mount --bind /dev /mnt/dev
  8. Type mount --bind /proc /mnt/proc
  9. Type cp /etc/resolv.conf /mnt/etc/resolv.conf
  10. Type chroot /mnt mount and chroot
  11. Type grub-install --recheck /dev/sdx (replacing x with your actual device)
  12. Type reboot (to reboot your PC) Install grub 2 and reboot
Make sure to remove your Live USB or CD. Upon reboot you should be presented with a GRUB2 menu. However, Windows is missing. Now, I show you how to fix that.
Making GRUB 2 detect Windows Installs:
  1. Proceed to boot into your Linux environment.
  2. Open a terminal and type sudo update-grub (enter your root password when prompted) sudo update-grub
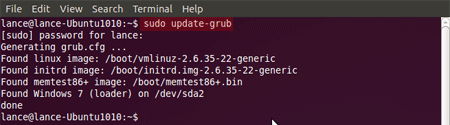
If all went well, grub should have updated it's menu entries to reflect what it detected. Including existing Windows partitions.
http://www.lancelhoff.com


Linux စာေမးပြဲေျဖဆုိခ်င္သူမ်ားအတြက္ ေလ့က်င့္ခန္း Exam


၁. Visual Cert Exam ကို ေဒါင္းၿပီး Extract လုပ္ထားပါ။
၂. ေလ့က်င့္စာေမးပြဲကိုပါေဒါင္းပါ။
၃. Visual Cert Exam Folder ထဲမွ VCE manager ကို run လိုက္ပါ။


Add ကို ႏွိပ္ပါ။


 Start ကိုႏွိပ္ၿပီးေလ့က်င့္ေျဖဆုိႏုိင္သည္။


Apache2 php5 phpmyadmin install လုပ္နည္း

Apache2 ထည့္ရန္
sudo apt-get install apache2

php5 ကိုထည့္ရန္
sudo apt-get install php5 libapache2-mod-php5

sudo /etc/init.d/apache2 restart

ဖုိင္းကိုဖြင့္ၿပီးedit လုပ္ရန္
sudo gedit /var/www/phpinfo.php

ယင္းဖုိင္ထဲတြင္ ေရးၿပီးသိမ္းရန္။

Mysql ကိုထည့္ရန္။

sudo apt-get install mysql-server libapache2-mod-auth-mysql php5-mysql

Phpmyadmin ကိုထည့္ရန္

sudo apt-get install phpmyadmin

sudo ln -s /usr/share/phpmyadmin/ /var/www/phpmyadmin

sudo /etc/init.d/apache2 restart

sudo cp /etc/phpmyadmin/apache.conf /etc/apache2/conf.d


Ubuntu 11.10 တြင္Login Screen ကိုဘယ္လုိေျပာင္းရမလဲ

ပထမဦးဆံုးအေနႏွင့္ Simple LightDM Manager ကို install လုပ္ရမည္။
Terminal ဖြင့္ၿပီးေအာက္ပါအတုိင္းရုိက္ပါ။
  1. sudo apt-add-repository ppa:claudiocn/slm (Enter)
  2. sudo apt-get update (Enter)
  3. sudo apt-get install simple-lightdm-manager (Enter)
Application ထဲတြင္ Simple Lightdm ကုိျမင္ေတြ႕ရမည္။


Ubuntu 11.10 တြင္Zawyioneႏွင့္ Myanmar3 ကိုဘယ္လုိinstall လုပ္ရမလဲ

  1. ဒီဖုိင္ေလးကို Download လုပ္ပါ။
  2. Terminal ဖြင့္ၿပီးေအာက္ပါတိုင္းလုပ္ပါ။
  3. cd Downloads (Enter) download ထားေသာ zg-mm3-kb.deb ကိုေတြ႕ရမည္
  4. ထုိ႔ေနာက္ ေပးထားသည့္အတုိင္း Force Install လုပ္ပါ
sudo dpkg -i --force-overwrite zg-mm3-kb.deb ၿပီးလွ်င္ Logout လုပ္ၿပီးျပန္ဝင္ပါ။
keyboard layout ထဲသို႔သြားၾကည့္လုိက္ပါက zawgyi myanmar3 ေတြ႕ရမည္ျဖစ္သည္


Sony Vaio VPCEG18FH Wireless Solve

Sony Laptop တြင္ wireless Enable လုပ္မရပါက။
၁ Terminal တြင္ rfkill list ကိုၾကည့္ပါ။
Acer wireless က soft block yes ျဖစ္ေနပါကေအာက္ပါအတုိင္းလုပ္ပါ။

sudo nano /etc/modprobe.d/blacklist.conf

#replaced by tulip
blacklist de4x5 ေအာက္တြင္ ေအာက္ပါအတုိင္းထည့္ေပးပါ
# add blacklist for acer module
blacklist acer_wmi
(ၿပီးပါက Ctrl + O, Enter, Ctrl + x သိမ္းၿပီးထြက္ပါ။)
စက္ကို Restart လုပ္ပါ

Ubuntu 11.10